| Inside: Wondering what should be included in a wedding invitation? Discover the essential elements of your wedding invitation suite and learn how to put together a wedding invitation suite to create the perfect invites. |
When planning my wedding, I was overwhelmed with all the details. One of the biggest challenges was figuring out what to include in my wedding invitation suite. I remember sitting at my kitchen table, surrounded by a sea of tiny Post-it notes with all the essential details I had written down over the prior months. Each note represented a crucial piece of information I wanted to include.
Still, I had no idea how to organize it all into individual cards.
The scent of freshly brewed coffee filled the air, but it did little to calm my nerves. I ended up cramming my wedding invitation with every bit of information I could think of, turning what should have been a beautiful introduction to our special day into a cluttered mess. I don't want you to make the same mistake.
What is a Wedding Invitation Suite?
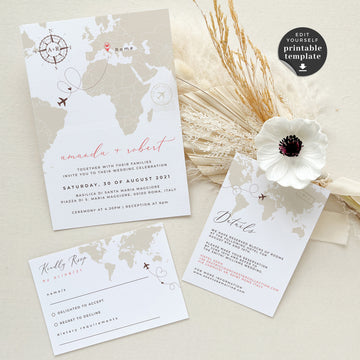
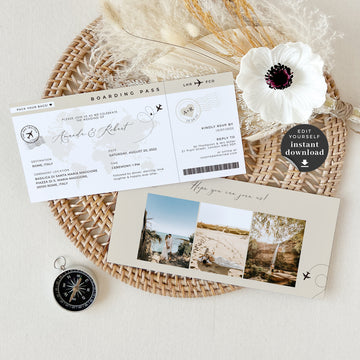
A wedding invitation suite is a collection of all the stationery elements you send to your guests to provide them with the details of your wedding. It typically includes the main invitation, RSVP card, reception card, and additional inserts like a details card. Each piece plays a unique role in conveying important information about your special day and ensures your guests have everything they need to celebrate with you.
What to Include in a Wedding Invitation Suite
A comprehensive wedding invitation suite ensures that your guests have all the information they need to celebrate your special day with you. Here are the key components to include:
1. The Invitation Card
-
Names: Include the names of the bride and groom. For a formal invitation, use full names including middle names and surnames (e.g., "Jessica Marie Smith and Daniel John Brown"). For a more casual invite, first names only are acceptable (e.g., "Jessica and Daniel").
-
Date and Time: There are various ways to present the date and time. For a formal touch, write out the date in full (e.g., "Saturday, the tenth of September, two thousand twenty-four, at four o'clock in the afternoon"). Use numerical formatting (e.g., "09.10.24 at 4:00 PM") for a simpler look.
- Venue: Provide the full address of the wedding venue. If the location is well-known, the venue name and city might suffice. For less familiar locations, include the street address.

2. Reception Card
If your reception is at a different location than the ceremony, include a separate reception card with the time and address of the reception venue. This ensures guests can seamlessly transition from the ceremony to the celebration without confusion.
3. RSVP Card
An RSVP card allows guests to confirm their attendance. Include a pre-addressed, stamped envelope for easy return. Make sure to ask for any dietary restrictions or preferences. Knowing how many guests will attend helps you plan seating, catering, and other logistical details.
4. Details Card
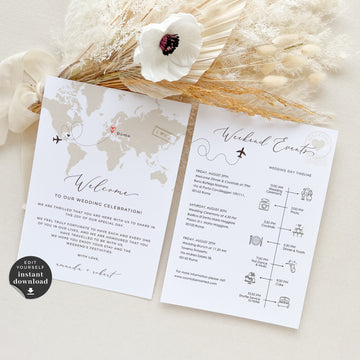
This optional card can provide additional information such as dress code, directions, accommodation details, and your wedding website. It can also mention recommended hotels, other travel info, and a detailed dress code to ensure guests are well-prepared. This helps guests plan their day and stay informed about all aspects of the event.
5. Addressed/Postmarked RSVP Envelope
This is a small envelope designed to fit the RSVP card and nothing more. It should be included empty, stamped, and marked with your address so guests can easily mail in their enthusiastic "yes!" responses back to you. This makes it convenient for guests to respond promptly, ensuring you get accurate headcounts.
6. Belly Band
A decorative belly band wraps around your invitation suite, keeping all the components neatly bundled together. It adds a touch of elegance and ensures that all the pieces stay organised.
7. Envelope
The outer covering that holds the entire suite. You might also include an inner envelope for extra protection and elegance. It provides the first impression of your wedding theme and protects your invitation suite.
8. Postage
Ensure your envelope is properly stamped to be mailed. Depending on the weight of the envelope, you might need two or more stamps to send it off. Proper postage ensures your invitations reach their destinations without any issues.
What to Leave Out
While it's essential to provide your guests with all the necessary information, there are a few things you can leave out of your wedding invitation suite:
1. Registry Information
Including registry details in your invitation can seem impersonal. Instead, share this information on your wedding website or through word of mouth.
2. Detailed Itinerary
While guests need to know the main events, a detailed itinerary can be overwhelming. Save detailed schedules for your wedding website or a welcome packet at the event.
3. Personal Love Story
Keep your invitations focused on the essentials. Personal anecdotes and lengthy stories are best shared during speeches or on your wedding website, where you can also include some photos.
4. Envelope Liner
While an envelope liner can add a decorative touch, it's often unnecessary and can add to your costs. Focus on other embellishments that are more visible and impactful.

How to Assemble a Wedding Invitation Suite
Let the assembly process begin! Gathering all the wedding pieces can feel like trying to piece together a giant puzzle—a bit daunting at first but incredibly satisfying once everything falls into place beautifully.
Below is the exact order for how to assemble a wedding invitation suite. This step-by-step guide ensures everything is perfectly bound together, ready for you to gather, seal, and send the invites.
We recommend working your way from the bottom of the suite to the top. You'll start with the invitation, and as each piece is added on top, like another layer, you can stuff it into your envelope for completion.
1. Invitation Card: Place the main invitation card at the bottom, print side up. Wedding invitations are usually assembled by size, with the largest card at the bottom and each subsequent card stacked on top.
2. Reception Card: If you have a separate reception card, position it face up on top of the wedding invitation.
3. Other Enclosure Cards: Stack the remaining enclosure cards—such as direction or detail cards, map cards, or hotel accommodations cards—face up on top of the reception card. If you have a wedding website, include the website address and password info on one of the enclosure cards. Many couples also opt for a QR code that guests can easily scan to visit the website. Ensure your website is updated before sending out the invitation suite.
- Pro Tip: If your main wedding invitation is a folded card, place the enclosures inside the folded invitation, rather than on top.
RSVP Card and Envelope: For a traditional, mailed-back RSVP card, place the envelope for your RSVP—printed side down—on top of the enclosure cards, with the envelope flap on the left. This envelope should be pre-printed with the mailing address. Then, insert the reply card (another term for your RSVP card) under the envelope flap, face up so the printed side is visible. Don’t forget to pre-stamp the reply envelope to save your guests the trouble of finding postage.

How to Apply a Belly Band
If you're using a belly band to wrap your stationery together, follow these steps:
- Lay the belly band over your neatly stacked suite, centering the personalization.
- Apply pressure with your thumbs to the top of the band and enclosures to hold everything in place.
- Wrap your index fingers around the back of the invite. You should be able to pick the suite up without anything moving.
- Flip the suite towards you so all of your information is face down. Carefully pull one end of the band over the back and crease it. Repeat with the other end.
- Pull both ends of the belly band tight without bending the sides of your stationery.
- Adhere together with the included glue dots.
Voila! You're finished assembling your first invitation suite.
Conclusion: Crafting the Perfect Wedding Invitation Suite
Creating a wedding invitation suite is a beautiful way to set the tone for your special day. Knowing what goes in a wedding invitation suite and how to assemble it ensures that your invitations are both informative and elegant. This knowledge will make your invites look professional and perfect, even if you have chosen to DIY them at home. Remember to keep your style and personality at the forefront, making your wedding invitation suite a true reflection of your love story.
As I finally sent out my beautiful invitations, the relief was palpable. I knew my guests would appreciate the clarity and elegance of each carefully chosen card. Your wedding day deserves the same attention to detail, without the stress of my initial confusion.
Ready to design your wedding invitation suite? Check out our pre-designed templates and get started today!
Frequently Asked Questions
Q: What should be included in a wedding invitation?
A: A wedding invitation should include the invitation card with the essential details (names, date, time, and location), a reception card if the reception is at a different location, an RSVP card with a pre-addressed and stamped envelope, a details card for additional information such as dress code and accommodation details, a decorative belly band, the outer envelope, and the proper postage.
Q: Why is it important to include an RSVP card?
A: Including an RSVP card lets your guests confirm their attendance and inform you of any dietary restrictions. This helps you plan seating, catering, and other logistical details, ensuring a smooth and enjoyable event for everyone.
Q: Can I include my wedding registry information in the invitation suite?
A: Avoiding registry information in the invitation suite is generally recommended as it can seem impersonal. Instead, share this information on your wedding website or through word of mouth.
Q: What should I include on the details card?
A: The details card can include the dress code, directions to the venue, accommodation details, recommended hotels, other travel information, and your wedding website. This helps your guests plan their day and stay informed about all aspects of the event.
Q: Do I need to include a separate reception card?
A: If your reception is at a different location than the ceremony, include a separate reception card. This ensures guests have all the necessary information to transition seamlessly from the ceremony to the celebration.
Q: How should I address the RSVP envelope?
A: The RSVP envelope should be pre-addressed and stamped to make it easy for guests to send their responses back to you. This ensures you receive timely and accurate headcounts for your event.
Q: Is it necessary to include an inner envelope?
A: Including an inner envelope is not mandatory. Still, it adds an extra layer of elegance and protection to your invitation suite. It also allows you to address the inner envelope more informally, such as including the names of children or guests.
Q: How much postage do I need for my wedding invitations?
A: The amount of postage needed depends on the weight of your invitation suite. Heavier or thicker envelopes may require additional stamps. It's a good idea to weigh a sample invitation at the post office to determine the exact postage needed.
Q: Can I leave out the belly band?
A: While the belly band adds a decorative touch and keeps your invitation suite's components neatly bundled together, it is optional. If you prefer a more straightforward look, leave it out.
Q: How do I ensure my wedding invitation suite reflects my style?
A: Customize your invitation suite with elements that reflect your personality and wedding theme. Use colours, fonts, embellishments like silk ribbons, dried flower wax seals, and custom wax seal to add a unique touch to your invitations.